Install Home Assistant OS in Proxmox

Home Assistant OS is a minimal operating system containing Home Assistant that can be run on bare metal or in a VM. If you would like to run Home Assistant OS on Proxmox VE, there is some manual setup that must be done to use the virtual appliance they provide.
Download Home Assistant OS
The first step of the installation process is to download the latest version of Home Assistant OS. Be sure to select the qcow2 format—this is the virtual machine disk format that KVM/Proxmox uses.
I recommend entering the web-based shell in Proxmox, or use SSH to download the image using the following commands:
cd /root

# Download Home Assistant OS v10.1
wget https://github.com/home-assistant/operating-system/releases/download/10.1/haos_ova-10.1.qcow2.xz

# Decompress the downloaded image
unxz haos_ova-10.1.qcow2.xz
Create a new VM
Create a new virtual machine with the following settings:
- OS: Linux 6.x-2.6 Kernel, Do not use any media
- System:
- Machine type: q35
- BIOS should be set to OVMF (UEFI), add EFI storage, but do not select pre-enroll keys, as we do not want secure boot enabled.
- Disks: Do not add a disk at this time, we will be using the .qcow2 image.
- CPU:
- 2-4 CPU cores
- I always set the CPU type to
host, so the CPU will match the one in my hypervisor host
- Memory: Minimum 2GB, preferably 4GB
- Network: Defaults
Import the Home Assistant OS VM image
Next, we’ll need to import the downloaded Home Assistant OS .qcow2 image. This can be done by running the following command:
Note: $VM_ID is the ID of your VM. The $STORAGE_ID will be the name of
your datastore in Proxmox. In my case, I named it SSD.
More information about the qm command
qm disk import $VM_ID /root/haos_ova-10.1.qcow2 $STORAGE_ID --format qcow2

# you can delete this file once you are done importing it - it is no longer needed
rm /root/haos_ova-10.1.qcow2
Once the qcow2 image is imported into the VM, we will need to set the bus/device
for the virtual hard disk. This can be done by going to the Hardware tab,
and click on the unused disk. Set the Bus/Device to SCSI 0, and then select
Add.

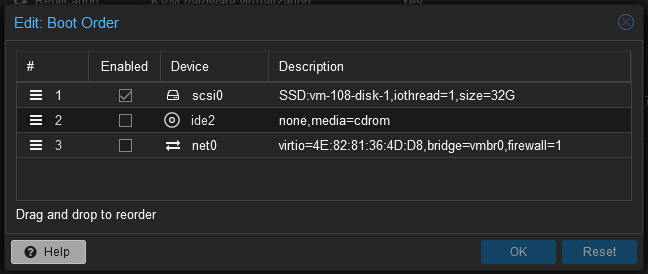
Next, we will need to configure the boot order of this virtual machine so it
will boot from our downloaded disk image. To configure the boot order, go to the
Options tab in the virtual machine settings, and click on the Boot Order
option. Check the box next to the scsi0 disk, and then uncheck the virtual
CD-ROM and network boot options. Click OK.
Once the boot order is configured, we are now ready to power on the VM. Power on the virtual machine, and then open up a console window. You should see the operating system boot, and after a short while, you will be presented with the IP address of your Home Assistant instance. You may now navigate to this address and begin setting up Home Assistant to your environment.