Installing PiVPN on an unprivileged Proxmox LXC Container
PiVPN is an easy to manage VPN server that can be run on a Raspberry Pi, or in a virtual machine or container. Today, I will be walking you through the process of configuring an unprivileged LXC container in Proxmox to use PiVPN. With newer releases of Proxmox, this process is quite simple and allows you to use an unprivileged container without needing to fiddle around with cgroups.
Please note that this guide assumes you are running Proxmox Virtual Environment version 7.4 or newer.
Creating the container
From the Proxmox web interface, create a new container with these options:
- Unprivileged: Yes
- Nesting: Yes
- Template: Debian 11 (See Container Images on the Proxmox Wiki)
- Disks: 8GB rootfs
- CPU: Match the number of cores on your CPU, in my case this is 4
- Memory: Default options (512MB is more than enough)
- Network: Assign a static IPv4 address
- DNS: Default options
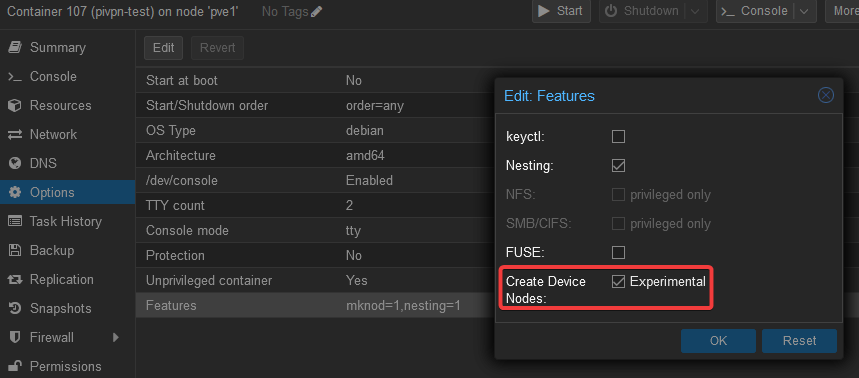
Once your container is created, go into the configuration and ensure that the option Create Device Nodes is checked in the container Options > Features.
Pass the tun device to the container
According to Wikipedia, a tun device is a virtual network device built in to the Linux kernel. This device operates at the network layer, and is used to tunnel IP packets. This device is normally not able to be accessed in an unprivileged LXC container, so we will need to make sure that this container is able to access it on the host device by using an LXC mount entry.
In order to pass through the /dev/net/tun device to our container, we will
need to modify the container’s configuration file. Proxmox stores these
configuration files at the /etc/pve/lxc directory, with each container having
its own .conf file. In my case, this container’s ID is 107, so the resulting
file we will want to edit is /etc/pve/lxc/107.conf.
Ensure that your container is not currently running, and then add the following line to its configuration file:
lxc.mount.entry: /dev/net dev/net none bind,optional,create=dir
Now that we have added a mount entry, we can start the container and install PiVPN!
Installing PiVPN
Start your container, and sign into it by using ssh or the Shell tab in
Proxmox.
First, we’ll need to update the repositories and then do a full system upgrade to ensure all packages are up to date.
apt update
apt -y full-upgrade
Next, we’ll install curl and then kick off the PiVPN installation process.
# Install curl
apt -y install curl

# Install PiVPN
curl -L https://install.pivpn.io | bash
PiVPN will begin the installation process. This process is relatively simple, and for the most part you can accept the defaults. The main things I recommend is to use WireGuard as the VPN option. It offers better performance than OpenVPN, and is very easy to set up. I also recommend using a public DNS name, using a Dynamic DNS provider if your IP address changes frequently. You should also enable unattended upgrades, especially as this is an internet-facing server.
Final steps
Once PiVPN finishes the installation, it will ask you to reboot. After
rebooting the container, log back into it and run the command pivpn debug.
You should see a similar output under the Self check section if everything
is well:
::::            Self check               ::::
:: [OK] IP forwarding is enabled
:: [OK] Iptables MASQUERADE rule set
:: [OK] WireGuard is running
:: [OK] WireGuard is enabled
(it will automatically start on reboot)
:: [OK] WireGuard is listening on port 51820/udp
From here, I recommend following the documentation on PiVPN’s website for the remainder of the setup.
Hope this helps!